5.31.2011

Amazing Song

Chris Tomlin-I Lift My Hands


Be still, there is a healer
His love is deeper than the sea
His mercy, it is unfailing
His arms are a fortress for the weak

Let faith arise
Let faith arise

I lift my hands to believe again
You are my refuge, You are my strength
As I pour out my heart, these things I remember
You are faithful, God, forever

Be still, there is a river
That flows from Calvary's tree
A fountain for the thirsty
Pure grace that washes over me

So let faith arise
Let faith arise
Open my eyes
Open my eyes

I lift my hands to believe again
You are my refuge, You are my strength
As I pour out my heart, these things I remember
You are faithful, God
You are faithful, God, forever

--------------------------------------------------------------------


This song has moved me to tears. God is so amazing, and I haven't been giving Him the Glory and Honor that He deserves with my life! 

 Make me to know your ways, Oh Lord; teach me your paths!
Psalm 25:4  

5.30.2011

Dollar Tree Gift Card Giveaway!

 Hey folks! Hope you're all having a blessed Memorial Day! We're going to barbecue later, and just enjoy eachother's company.


  Let's start the week off with a giveaway!


 I'll be giving away a $10.00 Gift Card to Dollar Tree! Who doesn't LOVE the Dollar Tree?!


Think of the things you can get at the Dollar Tree....TEN things, to be exact!


 + You can get some Inspirational totes! +
 + Or maybe some sunglasses! +
 + If you have kids, you could TOTALLY stock up on some pencils for the school year! +
 + You could also purchase some plates as decor, and put a monogram on them! +
 + Or you could pick up a beach tote and some things to go in it! +
 + AND you could always stock up on paint supplies to paint the never-ending projects going on! +

The possibilities are ENDLESS!
 So here's how to enter:

Mandatory -Become a Google Friend Connect Follower(or already are one!) and let me know!
2nd Entry - "LIKE" me on facebook and let me know!
("LIKE" button is on the right ----->)
3rd entry -Post about this specific giveaway on your blog and let me know!
4th entry -Post my button (you can find it on the right) ANYWHERE on your blog and let me know!

 That's it! Giveaway will end June 20th @ 11:59pm. Good luck!

5.26.2011

Personalized Letter Blocks


 Today, I want to share with you personalized wood letters that I made for some new friends of mine. 


 This was a 1x4x6 which was $1.92 cut down into blocks varying from 3 1/2 to 4 1/2 inches.


 I used $0.59 scrapbooking paper from Michael's cut down to the blocks size and modge podged them on.


 I then used my PRECIOUS (yannow, I think that is now officially my Cricut's new name-My PRECIOUS! *insert mental image of Gollum here*) to cut out the letters and popped them on, leaving me with these sweet little personalized blocks!


I even packaged them all pretty and cute before delivering them! How thoughtful of me ;-)


 I was also able to make two more names out of the 1x4 and didn't even use all my paper, so I can confidently say this project was less than a buck! Can you believe it?!

5.24.2011

BVCP

 Hey friends! 

 Recently, when mentioning a condition my daughter has, Bilateral Vocal Cord Paralysis, I was asked if she could talk; and I realized that it's such a rare condition that most people have no idea what it is! 

 So I decided to write about it, and you'll find my daughter's story in the button to the right, titled "My Daughter Has Bilateral Vocal Cord Paralysis".

 What IS Bilateral Vocal Cord Paralysis? Well click to the right to find out!

 Happy Tuesday!

5.23.2011

Breaking News

We interrupt your programming for this special report:

 I am in a FOUL mood.

 I went to wash my hair and style it today....and it is NOT cooperating. 

 It went from THIS:


To THIS!


And I'm hotter than a hornet about it!

I'm so used to throwing it up in a ponytail and going about my day. But it's looking like this style's gonna take work. 

 I won't lie, I'm kind of regretting it today. But in all honesty, it HAD to be done. After my recent relaxer and coloring, it started breaking and was extremely damaged. So off it came. 


 Oh goodness, I hope I become a master stylist, SOON.

Cute House Numbers

Well now that it's over, I can officially share that we had a SURPRISE 20th Birthday Party for my sister! It was so awesome! All the hard work leading up to Saturday paid off, and she was absolutely surprised.

 I must admit, I am SO glad that it's over and we can REST now. LOL!

I realized after I posted pics of my haircut how rushed I was and the pictures REALLY showed that, but I just had to share! I'll try to get better pics this week :)

Here's a little something I whipped together this past week! I got the idea from the LOVELY Michell over at Girl In Air, and I loved it so much, that I knew I just HAD to do it! My numbers were the dull silver ones from walmart that they threw up there before trying to sell the house, and you could barely see them.

So I picked up two scrap pieces of MDF from Home Depot for $1.02...

Cut one of the pieces into squares 
Painted them white
Spray painted my old numbers
Picked up some stars from Michael's and painted them...

 And here's the results!


 Love them now! So cheap, so simple and so cute!

5.21.2011

Busy Busy!

Sorry I've been quiet all week...I've been preparing for something BIG that's happening at our house today!

 BUT I want to share something with you all before we're back to our regular programming....I cut ALL my hair off!

 I'll go into detail later, but I'll leave you with this...

Before 
(only before pic with my hair down I could find right now!)


After!


Hope you all have an AWESOME weekend!

5.16.2011

Dining Room Table


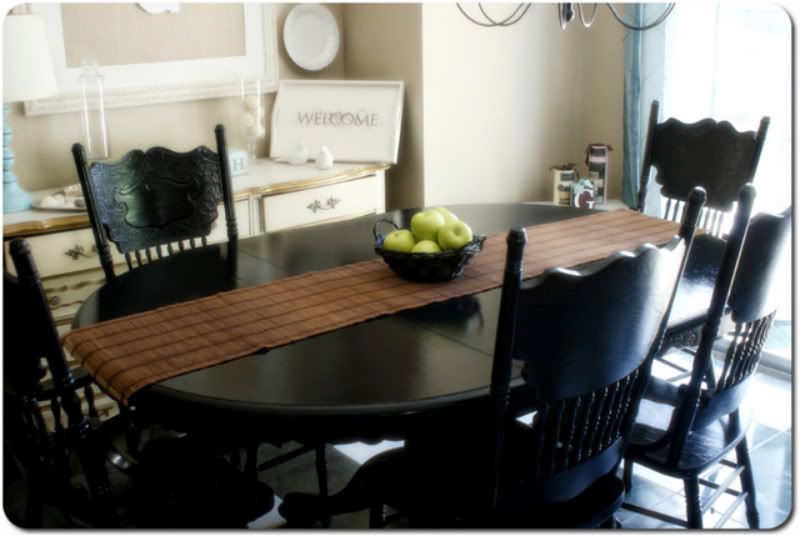
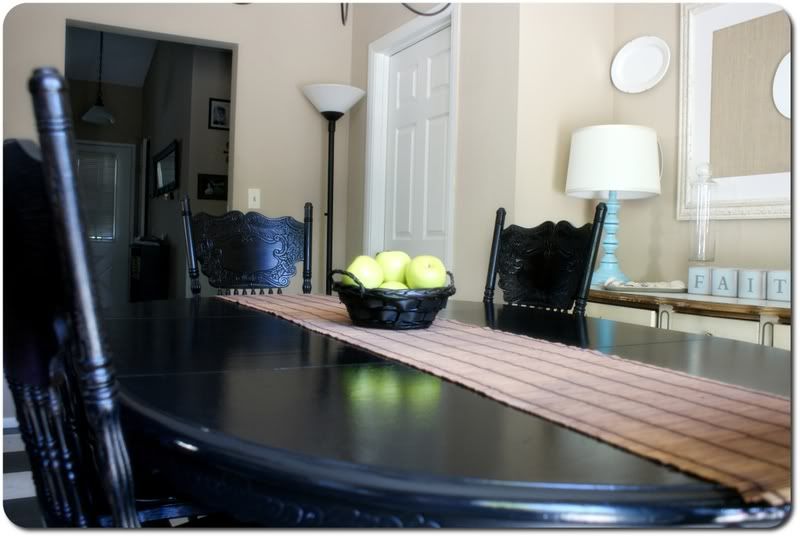
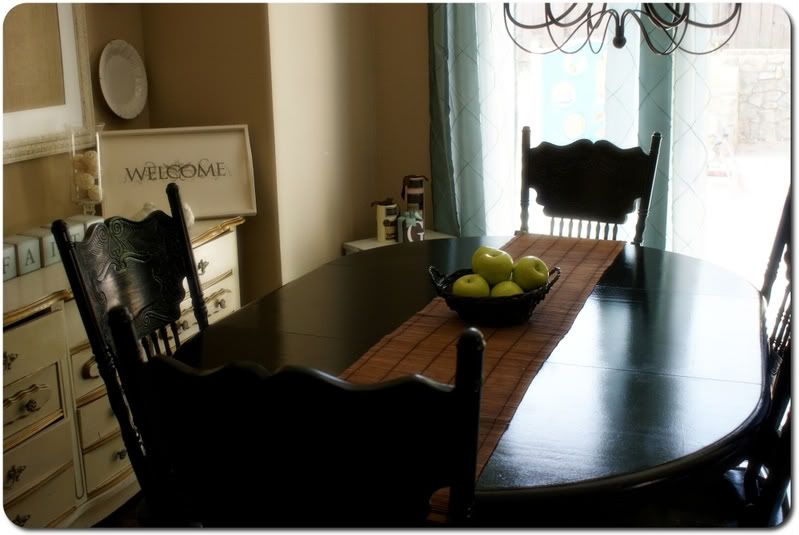
So today, I want to share with you my dining room table! The transformation makes me so happy, I could scream. 

Photobucket


As you can see, my dining room table was the cream of the crop in 1978 (like my calendar falling off the wall? That's how we roll). It was given to us by our old neighbors, and they gave me all matching 8 chairs! The table was a huge blessing because at the time we had a 4 person table with one of the chairs only bearing three legs, and we had our youth group coming over once to twice a week so we needed something desperately!

But it's 2011, not 1978. It had burn marks from a hot casserole dish burning through the tablecloth, scratches, cheerios, cup rings...it had definitely seen better days.

So after vigorous sanding, Kilz oil based primer, latex satin black paint on the table and Rustoleum's semi-gloss spray paint on the chairs, and a few coats of Minwax Polycrylic gloss, it was as good as new!

Photobucket

Photobucket

Photobucket

Please excuse the missing chair, she was painted later and was having the 3 day cure I did on the table and chairs.

I love it now! I've been contemplating bringing in different dining room chairs to spice it up a bit, but that costs money and a deep hunt on craigslist. So I'm okay with my extremely low cost renovation to my dining room table for now! 

Isn't she lovely? 
*tries hard not to break into stevie wonder song...*

5.15.2011

Quick Shout Out!

 Hey friends! Hope you're all having a FABULOUS weekend!

 Just want to give a quick shout out about all my bloggers who guest posted this past week! What fun it was! There was such awesome ideas from such beautiful ladies :)

 If you haven't already started following these awesome bloggers, PLEASE do!

Here is their blogs-

Natalia @ Ma Nouvelle Mode


Maridith @ Strictly Homemade

Jayna Rae @ Rock N Regalia

 I'm so glad I've gotten to know these ladies! 

 Tomorrow I'm gonna share my dining room table, so make sure to come back and see! 

5.14.2011

Cheapest EVER Kinda Sorta Roman Shade


How fun was that blog swap party?! LOVED IT!

Well! Now that blogger's come back to life, I want to share something I whipped together last night while watching Private Practice! I think it literally would have taken 10 minutes had I not been running to the window every commercial break. It is SO easy, ANYONE can do it!


 One of the things we really loved about this house is the fact that it not only had a sliding glass door into the back yard, but it had ANOTHER door to the back yard in the kitchen! With a screen door attached, so I can leave the door open while cooking and get a wonderful breeze in the kitchen! Awesome. 

  However! We live in the desert, and the afternoon desert sun is SOOOO stinkin' hot, especially in the summer! So while the door is an awesome perk to our kitchen, the afternoon sun blaring into the kitchen and dining room is NOT. This had to be fixed, and FAST!

 So I went to Joann's, where the blackout fabric was 50% off (SCORE!) and got 2 feet. I hemmed the top and bottom, and stuck it on the $0.99 store cafe rod I purchased a few days ago (double SCORE!).


 I measured where I wanted my ribbons to sit, and in this case it was 6 inches out.

 (See that? Let's just pretend that's not there)

Then, I took my ribbon and glued the center of the ribbon on the top of the curtain, so they evenly hang on each side of the curtain.


 Next, I glued the velcro dots onto my ribbon so that it would easily attach once the curtain was gathered.


I gathered the curtain, and then glued my beautifully tied bows where I thought they would looked best, and VOILA!


(ignore the gross looking window, that weirdness is INSIDE the pane because it's a double pane window.This house was TRASHED when we got it...just need to replace the door entirely!)

 A faux roman shade that looks magnificent when not in use!!! So super cute!!


Linked up at-
The Stories Of A to Z

5.13.2011

Guest Blogger #5: Jayna Rae @ RockNRegalia

Quick note: Blogger's being a jerk! It's been down for what seems like FOREVER, and has eaten two of my posts! But the show must go on, so here's my LAST blogger concluding Blog Swap Week!

 Please welcome, Jayna Rae!!!!

........................................................................................................................

I am excited to be doing my first OFFICIAL blog swap.
Woot! Woot!


I am so grateful to Janet for having me.
She is full of fun stuff.


I am Jayna Rae from 
RockNRegalia.


It's my little Blogland home,
and I try to make it cozy for visitors,
so please stop on by.


Okay, so today I am going to share a fun,
 little tutorial with you ladies.
It is bright, cheery, and Springy.
And ladies, 
it is still Spring for a minute or two more.


I don't know why, but this little craft project 
reminded me of the REM song
Shiny Happy People.

Most likely it is because this project involves 
a daffodil of sorts,
and daffodils make me a shiny, happy person.

This project was created from repurposed shorts pockets
(left over from this project)
a bit of yellow tulle
Twine
A Golf Pencil or crayon
And these note printables I created


This project took very little time to whip up,
and I just adore that it allows me 
to leave The Cuban Cowboy a cute note 
while I am running around like a mad woman.


So here is what you do.


First you take your left over pockets and pin them 
wrong sides together.
Top Stitch these pieces.
I used contrasting yellow thread 
and a zig zag stitch for dimension.


Now make the daffodil
(this is the most time consuming part,
 but it is still pretty quick)
First cut your tulle into a circle
and then bunch it up like a cone.
This is the daffodil center.
Set aside.


Now cut 6 petal shapes, 
as seen in the pocket photo above.
Using the petals make a flower shape and stitch.


This is the base.


Next,you are going to place the center 
that you created earlier atop the base.


Now you are going to sew this onto the base part.


This takes some eying and creativity, 
but just work with it until you see the right shape.


Next, attach the daffodil to the pocket.


You are now ready to make a handle by adding the twine.
Cut about a five inch length of twine.
Set it inside your pocket pouch.
Stitch across each end, making sure it is tightly secured.


Now the pouch is complete.


So I went to my computer and I created this simple notecards.
You can simply download them here.
This is the shape and size before I manipulated them to print 
and fit into the pocket.

I love how they carry the daffodil idea through.
I used my trimmer to cut them up and I slipped them
  inside the pouch.


I attached a crayon using a second piece of twine.
I just tied it to the existing handle.


Then I hung the pouch, note cards and all, 
on the door knob at the end of our hall 
because that's where we exit our home.


I love little projects like this because they are fast,
but have the ability to brighten up 
an otherwise bland area, like a doorknob.


Thanks again to Janet for swapping with me. 
What a fun week this has been.


5.12.2011

Guest Blogger #4: Maridith @ Strictly Homemade

Hello, I Heart My Glue Gun friends!! I am so happy to be participating in Janet's Blog Swap Party. I have not known Janet long but instantly became a follower of hers when I read her blog title. I mean, hello, who doesn't love their glue gun??? Plus, she is super sweet and super creative!!


A little about me! I am Maridith, with an 'a', at Strictly Homemade . I am a wife and a mom to three beautiful children! I am a seamstress, a crafter and a wanna-a-be decorator. I make clothes for my children, gifts for family and friends and almost all of my home decor. It would be safe to say that 90% of my home decor I have either, painted, sewn or mod podged!!


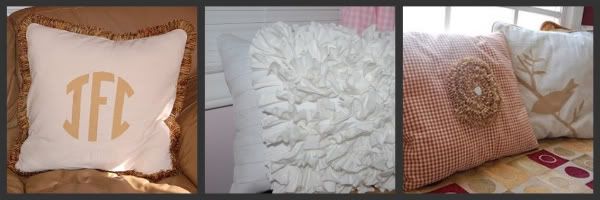
Today, I am going to invade Janet's blog with one of my obsessions ...PILLOWS!! I love decorative pillows and I pretty much make them all the time. Here is a small sample of some pillows I have recently made.

Photobucket

To show my love for pillows and a glue gun (wink, wink), I am going to share with you a

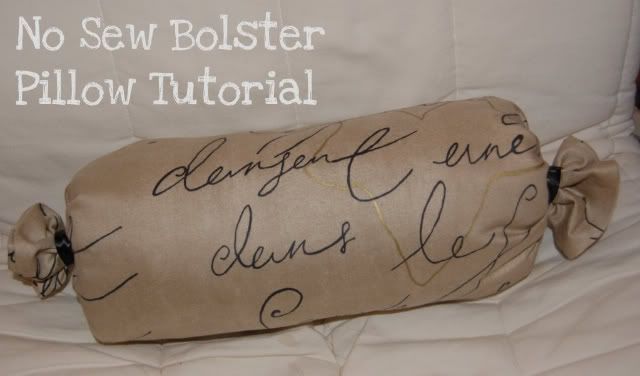
No Sew Bolster Pillow Tutorial

ANYONE can make these!! I promise!!

Photobucket


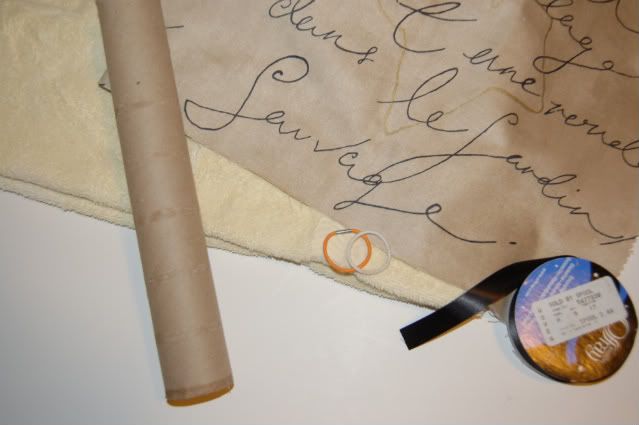
Supplies Needed: Old Towel, Paper Towel Roll, 2 rubber bands, 20"X26" piece of material, ribbon, glue gun (not shown)

Photobucket
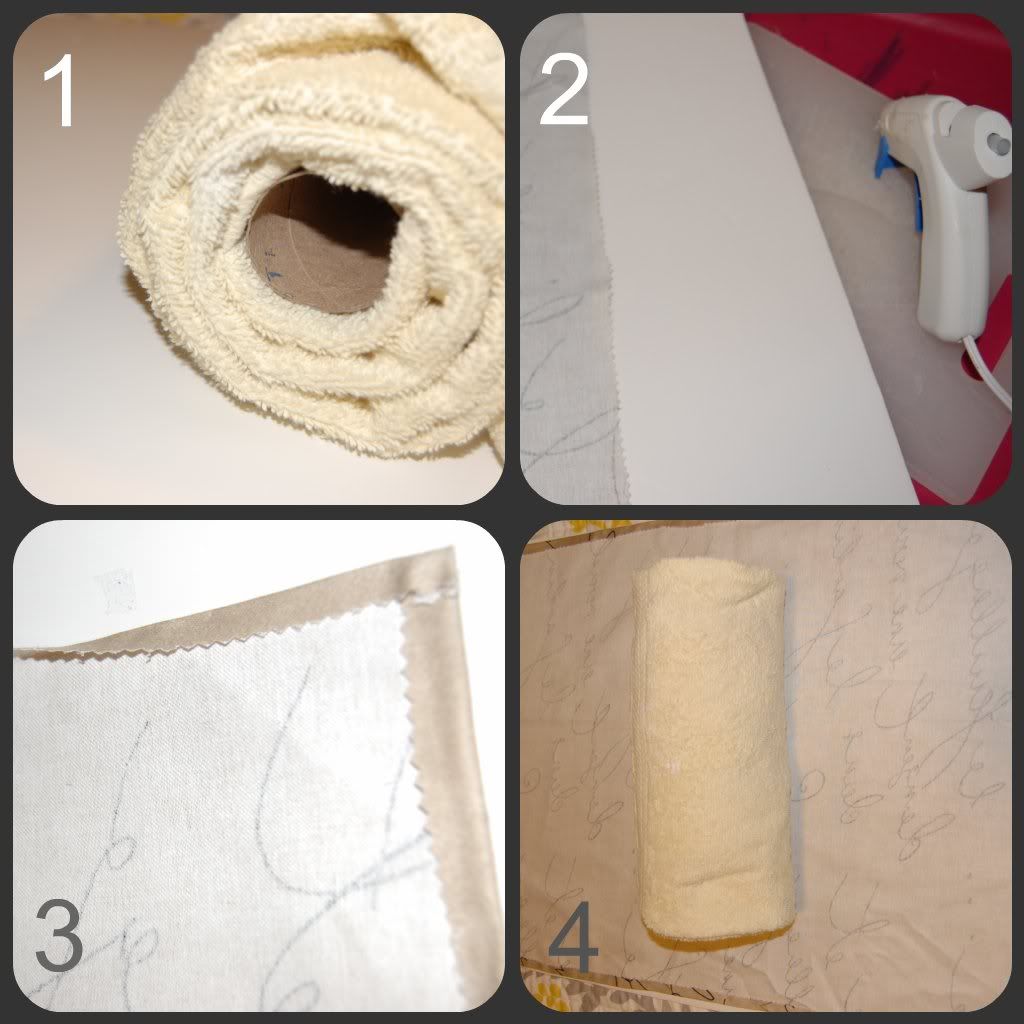
To prepare for assembly, cut material 8" wider then a paper towel roll by 26" long mine making it 20X26", use pinking scissors (not necessary but it does finish out the edges nicely without rolling them over twice.)

Photobucket

1. Fold towel to be the same width as paper towel roll and wrap towel around roll 2. Heat up Hot Glue Gun and prepare to "sew" 3. Turn over three edges and hot glue down. 4. Center towel/paper towel roll in the center of your hemmed material.

Photobucket

5. Starting with the unhemmed side and start rolling the material around the towel semi-tightly 6. Hot Glue the finished edge to the wrapped material 7. Take a rubber band and tie off one end and do the same on the other 8. Wrap ribbon around rubber band and glue down.

Photobucket


You are done!! Nothing to it!! If you have ever priced out bolster pillows you know they are expensive, with this design you can make them pennies to the dollar!!

I hope you have enjoyed my little tutorial. I would love for you to stop by my blog to see what else I have made Strictly Homemade!! Also, every Tuesdays I have a Linky Party called Strictly Homemade Tuesday where we show off all of our homemade goodies!!

Thanks so much Janet for hosting a fabulous Blog Swap!

5.11.2011

Guest Blogger #3: Layne @ Layne's Lovely Life

Hey y’all! I’m Layne, a small-town working wife and mom-to-be. I’ve been blogging for a few months now, initially as a way to document my feelings and the events during the process of buying our first home and my first pregnancy. However, I very quickly found it to be a great way to document life in general, meet awesome people living life one day at a time (just like me) and get tons of great info and advice from fellow homeowners, wifeys, and mommies! I really hope you’ll stop by my blog and follow me, I’d love for us to be friends!
                When Janet mentioned a blog swap, I was stoked. Firstly, just for the readers of my blog, she is so talented and has such fun idea, I think everyone deserves to see them! Secondly, because I love any chance to share a little bit of myself with others! Today I’m taking a page out of Janet’s book and showing you a craft project I recently did to decorate one of our guest bedrooms.  It was a little nerve racking, and tested my patience, it required me to dig deep for creative talent but it turned out amazing. I call this:

Make Art out of your Leftover Wedding Invitations!
(I can’t take credit for the original idea, I saw it in a magazine a few years ago)

Step 1:
Find at least one (preferably two) of your wedding invitations. For me, this required having my mom ship me some, because she is the hoarder and keeps everything.


Step 2:
Frames. You will need 5-9 square frames, color and style of your choice, but the more simple the better. I chose 7 12x12 black wood frames.  The key to finding the right frames at the right price is this: don’t have a design or number in your head until you start looking, you think you want 9 but you only find 7, and they’re super cheap-go for it. Be flexible. I decided to wait until a special occasion and ask for mine as a gift. What’s cheaper than free??

Step 3:
Matting. To give this a polished and professional look, you really need mats to go in the frames. Depending on the size and degree of fanciness that you are looking for this can range from cheap to more expensive than you think. I knew I wanted solid “sage” green mats, no special material. I went to my go-to for art projects, Hobby Lobby. Their art work and framing is always 50% off. Seven mats to fit in 12x12 frames and showcase 5 ½ x 5 ½ art cost me $35. Not too bad.

Step 4:
The art. The original idea said to pick certain words or phrases off of your wedding invitation that were special to you, to take them to a copier shop and zoom in 200-500%, crop and print. Easier said than done from what I found. Most copy shops don’t have this capability, and if they do by zooming in you make the image grainy. I found that there were two plausible options. 1. Kinkos said for something like $40 they would take the invitation and my instructions and send it off to be done at Kinko’s headquarters. I think this would have been great but I was on a budget so I chose option 2. I copied the text I wanted into my choice of word processor, blew it up to the size I wanted and cropped it accordingly. I used Microsoft Word, and it didn’t have a font as elegant as the one used on my invite, so I was able to download almost the exact font off the internet and use it that way. The artsy-ness of it all was that it shouldn’t be even, or centered. Some words should be cut-off, some should be off-centered, etc.


Step 5:
Paper. To give the project a finished look: print the art onto parchment paper to be framed. I went to my local office supply chain store and found that they sold fancy paper by the sheet! I have 7 frames, so I bought 14 sheets of parchment for .20 cents each. It’s always good to leave room for error, especially if you’re naturally clumsy and untalented, such as I.

Step 6:
Put it together! I practiced the printing on computer paper first. I used a ruler and very sharp succors to cut the paper. Like I said, I’m not a crafter, so I don’t own one of those fancy paper slicing machines with the grids so you know you’re cutting straight. Also, due to my lack of previous crafting I simply scotch-taped the parchment paper to the matting and put it in the frame.


Step 7:
Hang it. You want to make a design on your wall. Like I said, a lot of the “coolness” factor is the asymmetry of it all. I had 7 frames, so I did 3 rows of frames in vertical lines, 2 frames- 3 frames- 3 frames. This was the hardest part for me. Let’s just say there are some extra holes in my wall now. Because of the nature of the square frames, it is very noticeable if the lines are perfectly straight or the frames are hung crooked or off-centered. 


Step 8:
Step back and revel in your craftiness and new décor!

Layne @ Layne's Lovely Life